Example A-6: Manipulation of the Structure Using Masks (I)
In this example, a 2D part is created based on the data variable described in the Materials section. That data variable is the result of applying multiple Boolean masks as described in the Boolean Masks section and shown in Fig. 9. The procedure is followed in this example.
First, a 2D part with a shape of 5×5 voxels is created with a base material of 0 (empty space) and a voxel size of 0.02 units in all directions. The parameter log_debug is set to True for demonstration purposes.
Afterwards, numpy is imported and three boolean arrays are created based on Fig TODO:
from numpy import array, rot90

mask1 = array(((1, 1, 1, 1, 1),
               (1, 0, 0, 0, 0),
               (0, 0, 0, 1, 0),
               (0, 1, 0, 1, 0),
               (0, 1, 0, 1, 0)),
              dtype=bool)
mask2 = array(((0, 0, 0, 0, 0),
               (0, 1, 0, 1, 0),
               (0, 0, 0, 0, 0),
               (1, 0, 1, 0, 1),
               (1, 0, 1, 0, 0)),
              dtype=bool)
mask3 = array(((0, 0, 0, 0, 0),
               (0, 0, 1, 0, 0),
               (1, 0, 0, 0, 0),
               (0, 0, 0, 0, 0),
               (0, 0, 0, 0, 1)),
              dtype=bool)
They are then applied to the model. However, because of the difference in the definition of XY in the above array and the XY system in Abaqus, we have to rotate the arrays -90 degrees. If this is not done, the model needs to be rotated inside Abaqus. Application of the masks is done as follows:
part.apply_mask(mask=rot90(mask1, -1), value=1)
part.apply_mask(mask=rot90(mask2, -1), value=2)
part.apply_mask(mask=rot90(mask3, -1), value=3)
Finally, The part is exported to an Abaqus™ input file in 2D mode with CPE4R elements. The Non-Empty elements are requested to be exported.
The code can be found in the examples folder of the main repository. It is also included below:
"""Script for Example A-6: Manipulation of the Structure Using Masks (I)."""

from numpy import array, rot90
from vcams.voxelpart import VoxelPart

# Create the part.
part = VoxelPart(size=(5, 5), base_material=0, voxel_size=(0.02, 0.02), name='Ex A6 Mask Manipulation 1',
                 description='Example A-6: A 5*5 2D part create using three boolean masks.', log_debug=True)

# Create the three masks according to the images.
mask1 = array(((1, 1, 1, 1, 1),
               (1, 0, 0, 0, 0),
               (0, 0, 0, 1, 0),
               (0, 1, 0, 1, 0),
               (0, 1, 0, 1, 0)),
              dtype=bool)
mask2 = array(((0, 0, 0, 0, 0),
               (0, 1, 0, 1, 0),
               (0, 0, 0, 0, 0),
               (1, 0, 1, 0, 1),
               (1, 0, 1, 0, 0)),
              dtype=bool)
mask3 = array(((0, 0, 0, 0, 0),
               (0, 0, 1, 0, 0),
               (1, 0, 0, 0, 0),
               (0, 0, 0, 0, 0),
               (0, 0, 0, 0, 1)),
              dtype=bool)

# Apply the masks with their respective material codes.
# The masks must be rotated -90 degrees to account for the
# difference between Abaqus's XY direction and the defined array.
part.apply_mask(mask=rot90(mask1, -1), value=1)
part.apply_mask(mask=rot90(mask2, -1), value=2)
part.apply_mask(mask=rot90(mask3, -1), value=3)

# Output the part.
part.output_abaqus_inp(file_name='ex_a6_mask_manipulation_1',
                       elem_code='CPE4R', dim='2D',
                       material_elem_sets='Non-Empty')
The final model looks like Fig. 14. The elements sets are shown in the same color as the Materials section.
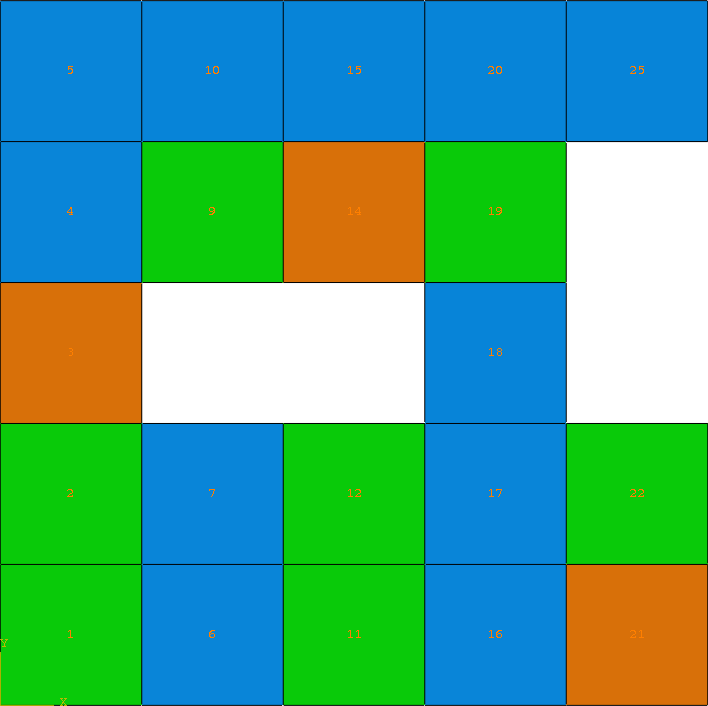
Fig. 14 Final model of Example A-6. Element sets corresponding to MAT-1, MAT-2 and MAT-3 are shown in blue, green, and orange, respectively.